Friday, July 8, 2011

SharePoint 2010 Timer Service keep failing

Event ID: 7031 The SharePoint 2010 Timer service terminated unexpectedly. It has done this 2 time(s). The following corrective action will be taken in 30000 milliseconds: Restart the service.

Event ID: 7024  The SharePoint 2010 Timer service terminated with service-specific error %%-2147467259.

Note: Check the Service Manager in Windows Server 2008, does it showing DCOM Error with Event ID:10016

 Resolution:
  1. Corrected DCOM error following article provided by Victor
    http://www.wictorwilen.se/Post/Fix-the-SharePoint-DCOM-10016-error-on-Windows-Server-2008-R2.aspx
  2.  Cleanly stopped sptimerv4 service (not waiting for it to fail, but stopping it from service manager)
  3. Restarted timer service

Thursday, June 30, 2011

PerformancePoint Dashboard Modifications via CSS Changes


Here is my situation. I have a very specific requirement for a particular style of PPS dashboard that I can handle it by making changes to the CSS files. It is this particular dashboard that I need to modify and all others should use the default style sheets. I have created a custom Master Page and within the Master Page linked to my new style sheets (i.e., "pps_Dashboard.css" has become "special_pps_Dashboard.css"). When I create a dashboard (either by publishing a dashboard via Dashboard Designer or creating a standard web page (based on my new master page) and pull on the PerformancePoint web parts) any changes I make to my custom CSS pages do not get applied. I used the IE Developer Tools to look at what style sheets were being applied and in the tool I can see that my custom sheets are being applied but the default PPS style sheets are also being applied and they are being referenced last and therfore their style is being applied.
So how can I get my sheets to be applied and not the default ones? My requirement is that for all the other dashboards that the default sheets be used but for this style I need my custom ones. I realize that I can use a content editor web part and reference it that way but my requirement really is that a user can publish from Dashboard Designer and not have to touch anything else.


Solution:
  1. Go to SiteSettings for the site containing the Dashboard
  2. Click "Master page" under the Look and Feel section
  3. Under the Alternate CSS URL section select the Specify a CSS file to be used by this publishing site ...
  4. Enter the relative URL to the file containing your custom CSS. - NOTE you should create a document library called say Style Library in the dashboard site and add the css file to it
  5. Click OK and you should be all set.

Wednesday, June 29, 2011

Word wrapping SharePoint list column headers


How you could modify SharePoints List View Web Part (LVWP) to word wrap column headers. He had found that as he had replaced lengthy text with status icons he could fit a lot more columns on the page – if only he could shrink the column headers down.
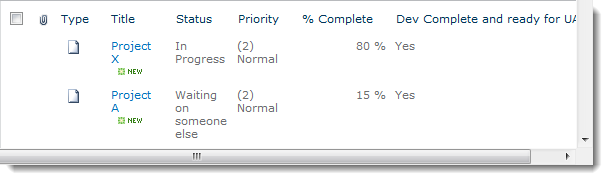
To be clear – this isn’t unique to lists using our Highlighter product, this example shows a basic SharePoint list with a long title that is causing a horizontal toolbar as it won’t word warp even though the column will only ever contain Yes or No.

Of course you could rename the column and shorted the name and put more information in the description – but that only appears on the Edit form so it’s a balancing act between being brief and giving enough info so everyone knows what the columns contains.

Anyway – how to make these columns word wrap?

Then we need to figure out which parts of the html to apply it to. This is done by HTML classes, so taking into account SharePoint 2007 and 2010 and different column styles (number/text/filterable/non-filterable) we end up with.
<style type= "text/css">
.ms-vh, .ms-vh2-nograd, .ms-vh2, .ms-vb
{white-space: normal}
</style>
So the white-space property is applied to html elements with a class of .ms-vh, ms-vh2-nograd and so on.
We could also make the column headers center aligned and red (just for an example) by putting in
<style type="text/css">
.ms-vh, .ms-vh2-nograd, .ms-vh2, .ms-vb
{white-space: normal;
text-align:center; 
vertical-align:text-bottom;}
</style>

So how do we add these styles to the page?

You can use SharePoint Designer, but perhaps the easiest way is to add it via a Content Editor Web Part (CEWP)
  • Go to your list.
  • Select Site Actions > Edit Page
  • Click “Add a web part”
SharePoint 2007SharePoint 2010
  • Select Miscellaneous > Content Editor Web Part
  • Click “open tool pane” then “Source Editor”
  • Add in the CSS from above
  • Select Media and Content > Content Editor
  • Select “Click here to add new content”
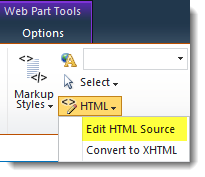
  • On the ribbon select Html > Edit HTML Source
  • Add in the CSS.
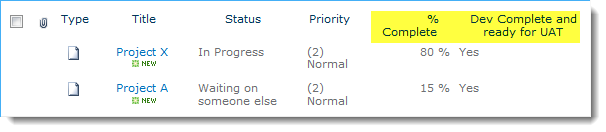
And – word wrapping :-

If this doesn’t work for you then as with all things ‘code’ exact syntax is important so check everything carefully – a “ is not the same as a ” for example. Also be sure that you’ve put the CSS in the HTML Source area, not just directly into the rich text editor.
You can add lots more effects (Red, bold etc) but sometimes its hard figuring out exactly what html elements and classes to target (e.g. you can’t apply a colour to the .ms-vh table header, you’ve got to apply it to an anchor element inside this – so “.ms-vh a”) – Firebug, the IE developer tools or the Chrome equivalent are invaluable for this – they will save your sanity!

Inspired by this post on Stack Exchange I looked at using Cascading Style Sheets to do this. Clare Stone. The property we need is white-space : normal

Hide / Disable My Site, My Profile and Social Tags


Hide / Disable My Site, My Profile and Social Tags


To hide My Site, My Profile and disable Social Tags

  • Go to Central Administration > Application Management > Manage service applications > User profile service application
  • From the ribbon, Click “Manage User Permissions” under People
  • In the “Permissions for User Profile Service Application” pop up, select a user group, e.g. All authenticated Users.
    Uncheck the “Permissions” item, base on what you want to disable. Click OK to save the settings.


Information
Unchecking Use Personal Features will hide My Profile
Unchecking Create Personal Site will hide My Site
Unchecking Use Social Features will disable Tagging, Note Board, and Ratings


Hiding the social tags across the farm
Since unchecking the the above feature will only disable the tags, it is still visible on your web pages. You can completely remove them by opting for one of the below methods..
To completely remove from all web applications.. go to CA > System Settings > Farm Management > Manage farm feature
Deactivate the feature "Social Tages and Note Board Ribbon controls" feature.


Hiding the social tags for specific site or web
If some some reason, you didnt want the social tag to be shown in a particular site or web, you can use css styling to hide it. Following CSS will hide the tags..


.s4-socialdata-notif {
display:none;
}
 
you can put this directly on the page using a content editor webpart or use a custom css file and include it in the masterpage

Tuesday, June 14, 2011

AjaxControl Toolkit Installation

In this tutorial I’ll show you how to install AJAX Control toolkit step by step:
You can download AJAX Toolkit .NET 4 “Apr 12 2010” released before 4 days, from http://ajaxcontroltoolkit.codeplex.com/releases/view/43475#DownloadId=116534, Once downloaded, extract AjaxControlToolkit.Binary.NET4 on your computer, then extract AjaxControlToolkitSampleSite.
After that you need to open Visual Studio 2010, So you can add AJAX Control toolkit to the toolbox. To do that press right-click in an empty space on your toolbox, then choose Add Tab.

image

You can rename the new tab to be “Ajax Toolkit” for example :
image
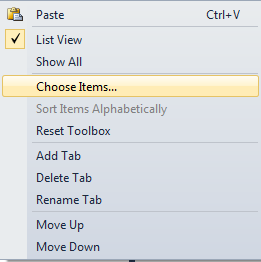
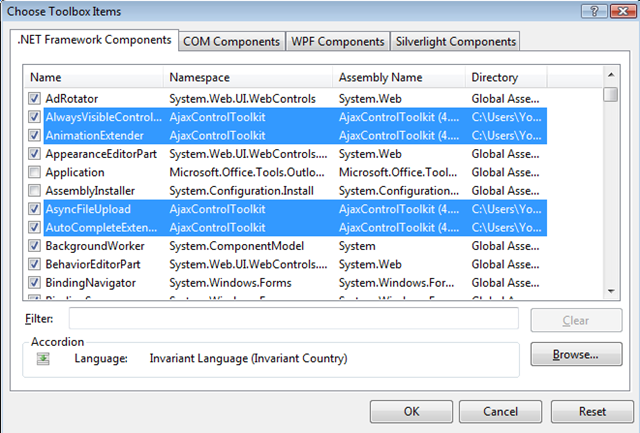
Then when it is added, right-click under the tab and select Choose Items:
image
When the dialog box appears Choose .NET Framework Components tab then click Browse button and find AjaxControlToolkit folder that you installed the AJAX Control Toolkit. In that directory you will find a sub-directory called AjaxControlToolkitSampleSite, and under that folder you will find bin Folder, in this folder choose AjaxControlToolkit.DLL which 5.59 MB.

The result of these steps, Visual Studio will load all the controls from the DLL file and by default it will be checked in this list:
image
To submit your steps press OK button.

Ultimately,you can find the components in your Toolbox and you can use it.

image

Happy programming!

Sunday, June 5, 2011

How To Hide Ribbon From Users Without Edit Page Privilege

Ribbon is a great new feature introduced by SharePoint 2010. It provides great user experience for users with elevated privileges, like contributors and site owners. However, for users with lease privilege, such as visitors and anonymous users, it seems like a big waste of page real estate. Because for those users, all ribbon provides are navigation breadcrumb and welcome control (user name with a drop down list on top-right corner).
So I have been asked to figure out a way to remove or hide the ribbon area from user with lease privilege, and here is how:

1) Open your SharePoint master page

2) Locate this line:<div id="s4-ribbonrow" class="s4-pr s4-ribbonrowhidetitle">

3) Change it to:<div id="s4-ribbonrow" class="s4-pr s4-ribbonrowhidetitle" style="display:none">

4) Now find the end of the “s4-ribbonrow” tag and add following block right after it:<Sharepoint:SPSecurityTrimmedControl ID="SPSecurityTrimmedControl2" runat="server" PermissionsString="AddAndCustomizePages"> <script type="text/javascript"> document.getElementById("s4-ribbonrow").style.display = "block";
</script
>
</
Sharepoint:SPSecurityTrimmedControl>

5) Save the new master page and publish it.

Now when a user without “AddAndCustomizePages” access to view the site, they would not see the ribbon area. You may want to move at least the welcome control to somewhere outside the ribbon area so your lease privilege users can see their user names.

The reason that you have to do it the other way around: make the ribbon invisible (step 3) and make it visible only when users have “AddAndCustomizePages” access (step 4) is the ribbon HTML code has to be rendered to the browser otherwise you would lose some basic abilities on the page, like, to be able to scroll up and down.

Friday, March 4, 2011

Migrating Content Database from SharePoint 2007 to SharePoint 2010


Pre-Requisites

  • MOSS 2007 should have SP2 Installed. You should have SP2 installed on your MOSS 2007 machine. The preupgrade check command was added only in SP2. So if you do not have SP2 installed you will not have the preupgrade check command in stsadm.
  • SharePoint 2010 should be set up on a different Server machine
After installing and configuring your new SharePoint 2010,
Migrating Content Database from SharePoint 2007 to SharePoint 2010
Step 1: We have to run the Pre-Upgrade check command on the MOSS 2007 server to find out if there are any issues in the SharePoint 2007 farm (like missing site definitions, features etc.).
Command: stsadm –o preupgradecheck

Step 2:Backup the content database of the Web Application from SQL Server.
Step3:Copy the backup db to the machine where SharePoint 2010 is installed and restore the backup of database in SQL Server using SQL Server Management Studio. To restore the backup you will first have to create an empty database in SQL Server and the restore your database one top of this new Database.
You may need to change an option in the "options" tab of the restore dialog to get it to work. (Overwrite db).
Step 4: Create a new Web Application in SharePoint 2010.
Step5: Remove Content Database from the new web application.
Go to Central Administration -> Application Management -> Manage Content Databases then Check remove content database and click ok

Step 6: Before you add the content databases to the Web applications, you can use a Windows PowerShell cmdlet to verify that you have all the custom components that you need for that database. At the command prompt, run the following cmdlet.
Use theTest-SPContentDatabase cmdlet to test a content database against a Web application to verify all customizations referenced within the content database are also installed in the web application. This cmdlet can be issued against a content database currently attached to the farm, or a content database that is not connected to the farm. It can be used to test content databases from SharePoint 2010 Products and from SharePoint Products and Technologies. Running this command will check if the database is ready for upgrade or not.
Command: Test-SPContentDatabase -Name –WebApplication
Ex: Test-SPContentDatabase -name WSS_Content_DB -webapplication http://sitename
This example tests the WSS_Content_DB content database against the sitename Web application, and returns a list of issues.


Step 7: Run the stsadm addcontentdb command to add the content Database to the web application which you created. This will initiate the upgrade process as shown in the screen below

Command: stsadm -o addcontentdb -url –databasename